The Blue Tit Nest Box
she said. She meant the blue tits that live in her current nest box.
“I need a new box for my Tits to go in”
I said.
“Ok”. “I need projects for my blog and YouTube channel”.
So here we are. Needing to make a nest box and not knowing what’s best for the type of birds were looking to house.
If you’re in a rush, skip to the end to see the “Make your own” section.
The homework
First stop was www.bto.org as they were providing a worksheet on the Blue Tit and making a nest box. Perfect as while I could draw a nest box, work out dimensions best for the target bird etc but seeing as it’s all done, I’ll credit bto.org and use theirs ?
Lessons learned from first YouTube video
I’m my first video, I had recorded 2.5 hours of build time which I had to shoehorn into 10 minutes. This wasn’t easy as I had lots on footage that really needed more time to show the viewer what was actually being done.
Much of the edit process requires speed changing of each video to make sure that the segment doesn’t draw out and get boring.
A cool thing I found is that with an Apple iPad or iPhone, you can use Bluetooth headphones to start and stop the recording. This is brilliant for doing something or staging and then hitting record and stop.
I found it equally time-consuming if you record multiple videos (Bluetooth start and stop to reduce editing) or longer videos that you then need to trim down, sometimes even cut out the bit when you ran away to find a clamp for a second or two. All that procrastination cost you in the edit room.
Filming Tips
Another good tip is make sure power is available to keep the recording running and much more importantly, check your data storage.
I was happily recording this video, pressing my Bluetooth button and filming the next part. However, I couldn’t see the screen of the iPad and it had run out of storage! AHH! Make sure you monitor this.
The iPad is years old and has photos and videos on it from a 13 year old girl that likes to re-enact the randomness she sees on YouTube. I’d like to see the parody of my videos ?
From then on, I’d record some and then upload it via USB to my laptop. This seemed to be ok as I just did this when having a break.
Making the box itself
I tried to show in the video that I had a worksheet from bto.org and some 12mm offcuts of hardwood ply.
Typically (according to instructions) the box should be made with 15mm as a minimum but this is an offcuts project. To hand will do.
Common sense suggests that ply won’t last long in our UK climate but I don’t mind if the birds don’t for a year.
Besides some good quality outdoor varnish should protect it from the worst of UK weather.
Marking out
The first actual making step is to mark out the dimensions of each piece on the wood. So looking at the diagram and cutting list, I could see it was all 150mm, so I set about marking the two offcuts I had to 150mm.
These were then cut on the table saw and left me 6 X 150mm wide boards. Each of these boards had a job and currently they were all 300mm long.
I marked out the roof, bottom, top, back and the sides. The sides are angles so I’d need to use a mitre to cut them on my table saw.
I like to draw all my marking lines through. By this I mean join them from one mark to the other and create a visual line. This isn’t needed on a table saw but I use it an additional safety feature as if the line is t passing through the blade correctly, I can see at that line. This provides the option of glancing from fence to cut line and means mistakes can be avoided.
Once all the parts were marked, I set to cutting them. Each one needed the fence moving between each cut but the marks I made on each meant that lining up the line with the blade while butted up to the fence was easy and quick.
Once all were cut, I did a dry run assembly. There aren’t any tricky joinery or fixings on this project but it does call for a “notch” to be made in the back part.
The notch is to receive the edge of the roof when closed. This means that any water will run down the roof and off instead of pooling and rotting the wood / making nest wet.
Making the notch
While I had the box assembly together, I marked were the roof would sit. Then using those marks, I set my table saw depth .5mm high and ran the back over the saw a few times to the 12mm roof thickness.
After checking the assembly again, I set about pre-drilling some holes for the screws in the front, sides, back and bottom. The bottom needs some drainage holes, so I drilled these too. The roof isn’t attached at this point.
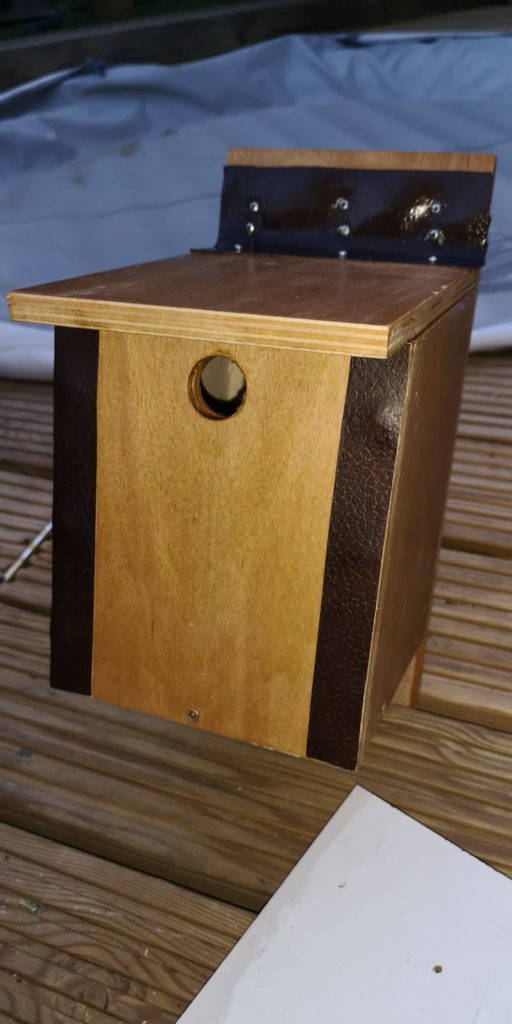
I also made a 25mm hole close to the top of the front and at least 120mm from the box bottom. This will help mum and dad keep the kids in.
The hole size is to keep larger Tits and other birds out. A larger hole can be used but less likely to be used by blue tits as they get evicted.
It’s nearly done
Once I had attached all the parts, I then needed to work out how to attach the roof.
The instructions say using rubber is a good idea and I agree but I don’t stock much rubber ?
We do have some old leather that was a sofa covering. I stripped the leather off before I disposed of the sofa some time ago. I only needed a few strips.
On with the hinges!
I cut a piece of leather which was long enough to have 15mm on the back and 25mm on the roof, creating a hinge. The hinge is fixed with expanding glue and also screwed down with short screws. I had to pre-drill holes in the leather as the screws made the leather twist in ugly ways. Left to dry, it seems to work fine.
The finish
To finish this project off, I wanted to give the wood some varnish. It’s important only cover the outside of the box as the inside needs to remain natural as possible. We don’t paint our cots (cribs) in lead paint, so we don’t put chemicals near baby birds ? simple.
Ok, so now it’s done. It’ll be off to its new home sometime soon but maybe next year, it’ll see a young family.
Make your own
To make this project you will need the following:
- Some wood of 15mm(or more) X 150mm X 1170mm.
- The “Blue Tit Nest Box” from www.bto.org
- Something to cut boards (tablesaw, chopsaw, handsaw, router, jigsaw, hand saw)
- Something to cut notch for roof (tablesaw, chopsaw, chisel, router, a sharp knife? Etc)
- Glue
- Screws (lengths varied on my project but looking to not go through walls of wood).
- Leather (of small hinges or rubber).
- Some protective paint or stain for exterior.
- Approximately 1.5 hours not including glue and varnish dry time.
Please let me know if you build this, if you have any suggestions on the blog here or the video.
What would you like to see made with offcuts?
Do you think the birds will like this new home?
Comments welcome here, on YouTube and on the Facebook page, so don’t be shy.
Stay safe all! ???